


Types of Bitless Bridles: Traditional Hackamore

All photos courtesy of Trafalgar Square Books.
An Exclusive Excerpt from Soft, Round & Bitless: How to Train or Transition Your Horse for Competition and Pleasure by Ali Kermeen
TRADITIONAL HACKAMORE
Good For: Refined Communication
Not Ideal For: English Aesthetic
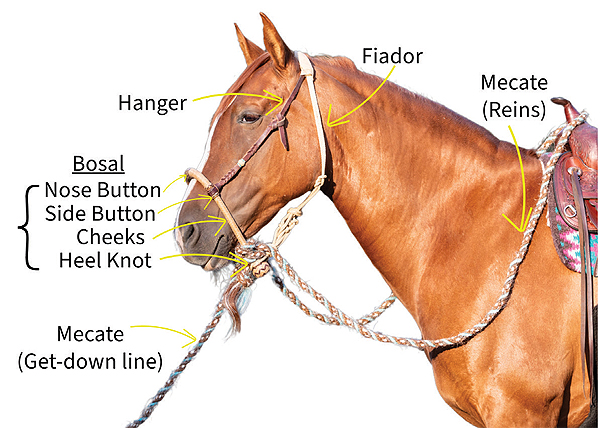
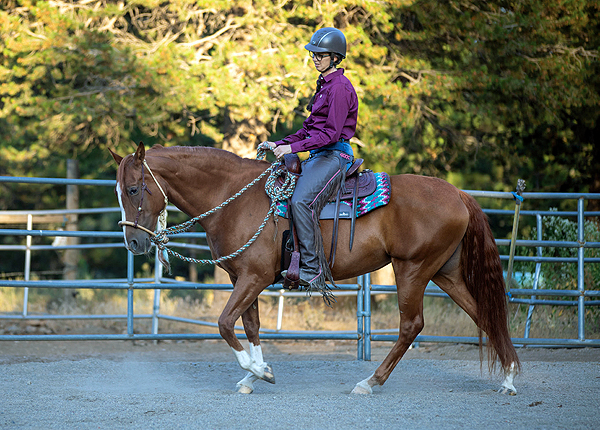
The traditional Western hackamore is my favorite bitless bridle. It is what I have studied the most, and a great place to start in your bitless journey. At a minimum, it consists of a bosal (rigid noseband), a hanger (strap that connects both sides of the bosal by traveling behind the horse’s ears and over the poll), and a mecate (long rope that forms the reins and lead rope).
This style of hackamore has a long and rich history, especially with the vaquero horsemen of the American West. The materials used to create the traditional hack-amore are what the vaqueros had on hand as they were working with horses and cattle. All hackamores are not created equal, and you get what you pay for. Poor quality hackamores are poor quality equipment.
The Bosal
The bosal (bo-ZAHL) is the noseband section of the hackamore. It traditionally has a rawhide core and added material braided around the core. From roughest to softest, this material could be rawhide, latigo, or kangaroo leather.
The bosal has a large knot at the bottom, called the heel knot. Smaller knots, called side buttons, serve to hold the hanger (the strap that goes over the horse’s head) in place.

Caption: On the bottom right is a 5/8-inch rawhide bosal. The weight, thickness, and rigidity of the 5/8-inch rawhide hackamore make it the ideal starting place in your hackamore journey. Above the rawhide bosal is a 5/8-inch bosal made of latigo leather. Latigo leather is more pliable than rawhide, which some horses and trainers prefer. Next is a 1/2-inch bosal, which is appropriate for horses that are doing well in the 5/8-inch and ready to go to a lighter piece of equipment. Finally, on top is a kangaroo 3/8-inch bosalita. The kangaroo leather is flexible and has a tacky quality. This is suitable for use in a two-rein set up, or under a bitted bridle. Photograph by Kathy Colman.
The bosal should fit your horse like a hat, touching all around the horse’s nose with even pressure. There should not be gaps of air between the bosal and the horse, except directly under the horse’s jaw. There shouldn’t be any parts that are particularly tight on the horse’s nose either. Achieving this fit may require some after-market shaping. To get a bosal to fit a horse better, I usually try to shape it with my hands before I put it on my horse’s head. Usually, this requires squeezing it together at the top and “opening” it at the bottom. When storing a bosal that needs shaping, I wedge something large and hard, like a block of smooth wood, or a wine bottle, in the area that needs to widen. I then use string to tie up the part that needs to become tighter.
You may notice that the side buttons make the hanger pass very close to your horse’s eyes. Ideally, you want the hanger to pass as close to the eyes as possible without touching them or injuring the delicate skin nearby. This adjustment allows a greater length between the hanger and the rein, which creates improved signal capacity. Additionally, the bosal’s cheeks will have sufficient contact with the sides of his lower jaw to create a “presignal” from the reins; this occurs before the rein fully engages, putting pressure on the horse’s nose.
When starting off in the hackamore, choose a bosal that is 3/4- or 5/8-inch in diameter. The extra surface area makes the cues of the thicker bosal easier for the green horse to distinguish. The heavier weight of the heel knot on a thicker bosal also aids in the clarity of signal.
If your goal is to create a Californio-style bridle horse (see sidebar), you will need to introduce gradually thinner bosals before you transition to a bit. But for most people, a 5/8-inch hackamore will serve you well.
When sizing the opening of the bosal, you want to make sure it is big enough to accommodate your mecate, but not so big that you need to wrap your mecate more than three times around the bosal to obtain the proper fit. Once your mecate is tied on, put your thumb between the bottom of your horse’s jaw and the top of the mecate knot. As already mentioned, when your bosal is properly fitted, your thumb should be contacting the mecate and the hair under your horse’s jaw at the same time. If you do this size check and find the bosal is too loose or too tight, adjust the number of wraps until you get the proper fit, or find a better-fitting bosal.
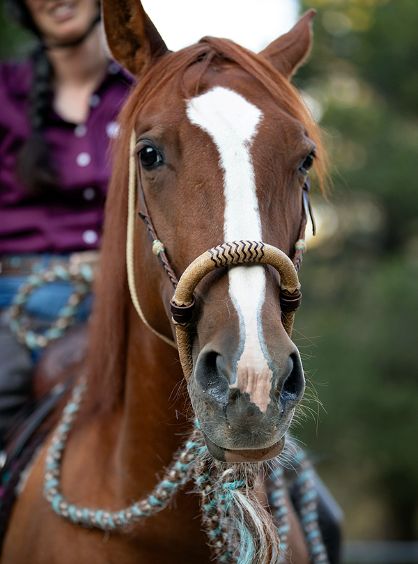
Risa’s bosal fits her like a hat. It makes even contact over her nose and along her cheeks. She has an ideal amount of space between the mecate and her lower jaw. Photograph by Hollie Cower.
The Mecate
The mecate (muh-cah-TAY, sometimes called “McCarty”) is a rope about 22 feet in length with a diameter that matches the diameter of the bosal. This rope is tied in a certain way (see p. 84) around the bosal to form reins and a “get-down line” (lead rope). The get-down line is used when the rider is unmounted. The reins stay on the horse’s neck.
Mecates can be made of horse mane hair, cotton, wool, mohair, nylon rope, and even human hair. Hair mecates are the most traditional and have a prickly texture that can act as a sensory aid to help teach the horse to neck-rein. The prickly texture can also help a rider who has hard hands learn to lighten up. Some cotton and mohair mecates are soft in the hand but stretch when in use. If you are working in wet weather, you might prefer a wool or yacht rope mecate.
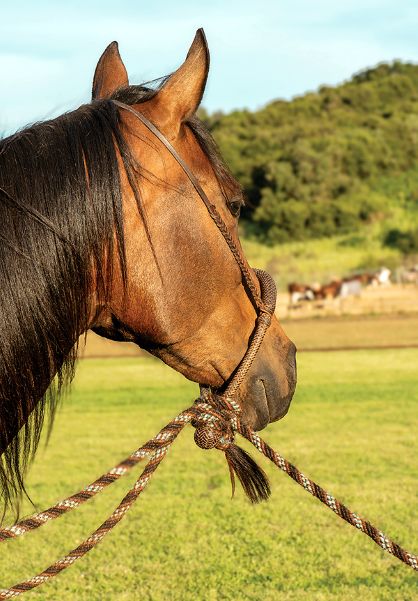
Rosie’s bosal is not a perfect fit. There are air gaps between her face and the nose button (the thick stiff wrapper over the nose). With use, it will start to fit her better. I could hurry the process along by using a shaping device between uses. As it is, she is happy to work in it and it is not causing any rubs, so I will likely take the approach of using it until it fits better. Photograph by Kathy Colman.
Fiador
The fiador (rhymes with “Theodore”) is an optional piece that makes a hackamore look a bit more like a halter (fig. 2.12). It loops over the heel knot of the bosal, then splits to go behind the horse’s ears before being tied back together like a rope halter. It is attached to the hanger with a browband, crown channel, or simple loop.
There are two reasons you may choose to add the fiador. The most important is that a fiador makes your hackamore trail-worthy. If you are leading your horse in his bosal without a fiador and he goes to pull away from you, he is likely to slip out of his hackamore and free himself. This could put you in a tough spot if you are far from home!
The second reason to use a fiador is to hold the bosal steady on the horse’s face. This makes it easier for the horse to figure out if a feeling is caused by a signal from the rider versus gravity moving the bosal as the horse moves. Some people like riding with a fiador, and some don’t. Fiadors can be inexpensive, so try one out and see if you and your horse like the feel.
Rosie is soft and round in her hackamore with a fiador. Photograph by Kathy Colman.
Use
You can use a traditional hackamore with one hand or two hands. The goal with any hackamore (and any good riding) is for the rider to principally use her seat and legs to direct the horse, instead of pulling the horse around by his head. The rigidity and fit of the hackamore helps this process. When shaping the horse’s body, the rider can position the hackamore where she wants the horse’s head to be. Once the horse moves his head to the desired location, the hackamore makes even contact around his nose again.
This excerpt from Soft, Round & Bitless: How to Train or Transition Your Horse for Competition and Pleasure by Ali Kermeen is reprinted with permission from Trafalgar Square Books (trafalgarbooks.com).