


Step By Step – Setting Your Practice Trail Course for Success in the Pen
Click here to read the complete article
90 – July/August 2019
By Kristen Spinning
 Perfecting the rhythm, flow, and connection that elevates your Trail work from the mundane to the sublime requires countless hours of practice over the poles. Many Trail exhibitors seek that precision by setting up Trail obstacles at home. It sounds simple: throw a few poles out there and do some lope-overs. However, to really make your extra practice time beneficial, a lot of thought and planning needs to go into the course setup. Accuracy matters if your goal is to closely simulate the challenges you will face at the show.
If you show in Trail classes around the country, you have likely ridden a Tim Kimura pattern and maybe even cursed him once or twice for a tricky bit you weren’t expecting. Tim views himself as a choreographer who designs courses that not only challenge but present opportunities for horse and rider to reveal the finesse of their dance. He’s also a tireless advocate of those dance partners practicing as much as they can. “If you don’t have poles to go over at least every other day, it’s going to take you forever to master them. The only way to get better at going over poles is to go over them,” he says. Kimura is also a firm believer that, no matter the discipline, your horse and your horsemanship will benefit from working Trail obstacles.
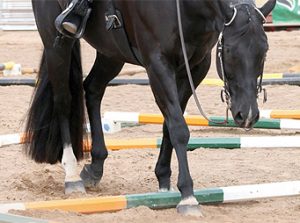
Kimura says, “The most common mistake I see when people set up their own practice course is that they don’t use a tape measure. If you want to do it right, you have to measure it out properly! Distance matters in Trail, and the people who are serious about it keep a tape measure handy. Not only do you have to measure, you have to know what to measure. His Trail patterns always measure the spacing between poles from inside edge to inside edge. You don’t need to worry about the diameter of the pole, because it’s really the spacing you’re practicing. He adds, “Out in the field, some people have the old poles that are a true four inches; but, now the modern ones are lighter, even as small as three-and-one-quarter inches. So, it’s important that you keep the gaps consistent. We use two-foot, three-foot, and six-foot for walk, jog, and lope.”
Kimura also uses a lot of cones in his patterns and is an advocate of setting your practice course with proper cone placement as well. “If you want to be consistent with the way you will see the pattern at the horse show, you should be using cones at home,” he says. A typical cone has a ten- or twelve-inch base. Tim is insistent that the courses he designs are set using measurements from the base of that cone to the pole, rather than from the center of the cone. He adds, “I also like using the cones because I can make sure my poles are perpendicular to the square base. That way I can use it to align the obstacle.”
Click here to read the complete article90 – July/August 2019