


DIY Equestrian Christmas Decorations: Part 1


Mini Gold Horses make great ornaments for your Christmas tree!
By: Brittany Bevis
Deck the stalls with boughs of holly, Fa-la-la-la-la, La-la-la-la! Chances are you might be looking for some ways to incorporate your love of horses into your holiday decorations this year. Although some of you might see the word DIY and get the same feeling in the pit of your stomach that arises when you’re faced with a tricky triple combination or a difficult Trail pattern, never fear! We have six easy projects that will infuse some equestrian essence into your holiday decor just in time for Christmas, and we’re going to walk you through them, step by step.
#1 Mini Gold Horses-
Difficulty Level- 1
Estimated Time– 1 and 1/2 hours
This is a fun yet inexpensive craft that doesn’t take a lot of skill but comes with a huge sparkly pay off! First, you’ll need a handful of small toy horses. These can be picked up at any craft, toy, or party store for a couple of bucks, depending on their size. The small miniatures (1.5″-2″) would be great re-purposed as ornaments for a miniature tree; the larger ones (3″-5″) are perfect to use as name card placeholders for your dinner table.
Next, you’ll need a can of gold or silver spray paint. Most spray paints can be used on surfaces like wood, plastic, wicker, glass, and paper. You can find great deals on super shiny Krylon Gold Metallic Spray Paint at Hobby Lobby. Depending on what type of spray paint you use, the figures may need one or two coats. Once the paint has dried completely, (about two hours) break out your trusty Mod Podge.
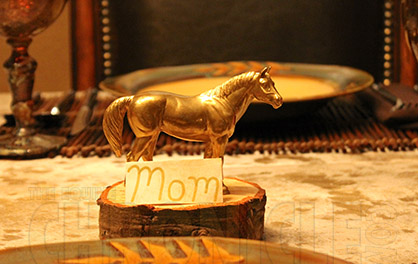
To complete the Mini Gold Horse place setting for our holiday table, we re-purposed a chunk of spruce wood that vendors typically cut off the bottom of Christmas trees. These pieces normally get thrown away, so just ask if you can keep them.
Cover the figure with an even coat. The Mod Podge starts out white but dries clear. Let it dry for a few seconds, but so it’s still tacky to the touch, then sprinkle on the glitter! You may need to reapply a second coat of Mod Podge and glitter once the first coat dries. We used a extremely fine powder glitter, so it gave the horse more of a shimmer effect. All you need now is a shot of clear sealer to prevent stray glitter specks from falling off, and you’re done!
These mini gold horses can be arranged among candles to spruce up holiday decor, or if you’d like to turn them into ornaments, simply use a drill bit to attach a small screw eyelet into the back of the horse and hang with a sparkly ribbon.
If you’re going for a more rustic look, swap the glitter for fun chalkboard paint like Rust-Oleum Black Speciality Chalkboard Spray from Walmart. Then, write your guests’ names in chalk and use as placeholders at your holiday table!
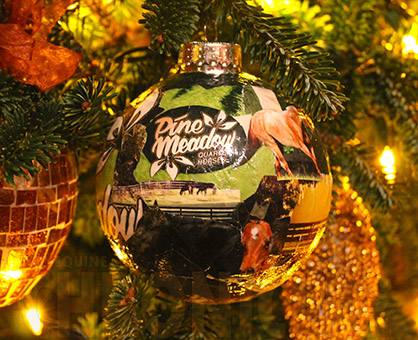
For this example, we used Pine Meadow Quarter Horses ad with its great photos.
#2- Equine Chronicle Ad Ornament-
Difficulty Level- 3
Estimated Time– 2-3 hours
This is one of our favorite decorations, because it includes everyone’s favorite magazine! First, you will need the latest edition of The Equine Chronicle. If you haven’t picked one up at a major horse show lately, click here to subscribe and have it delivered right to your door.
Next, use a pair of scissors to cut out images, text, and photos from the ad that you’d like to feature front and center on your ornament. More than likely you will need additional paper scraps, so you can either browse through the magazine with your color scheme in mind or use other decorative paper for the background.
Mod Podge is perfect for this project too. Starting in small sections, paint a thin layer on the globe’s surface. Then, start arranging the pieces of paper (one or two at a time) that will make up the background for your text and images. Don’t worry if they overlap; that’s the fun part of decoupage!
Once you place a paper piece, hold it for a few seconds until it starts to stick. Then, paint more Mod Podge over the top of the paper and smooth out the wrinkles with your fingers. This can be a messy project, so you might want to grab some plastic gloves from your vet box.
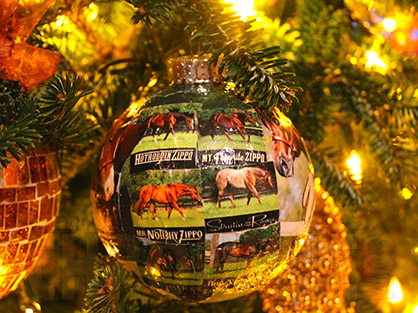
All of the stallions fit on the back!
Continue this process until the entire surface is covered. Then, start applying your photos, text, and graphics using the same technique. Paint on a final coat to seal everything in and you’re done! Hang your ornament on your tree or make custom ornaments for all your barn mates to give as personalized gifts!
Stay tuned for DIY Equestrian Christmas Decorations: Part 2, to see what else we have in store…