


Bit Troubleshooting

Click here to read the complete article
584 – October 2019
 By Kristen Spinning
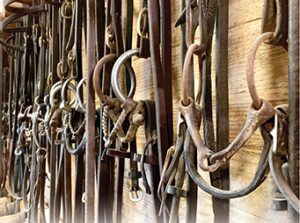
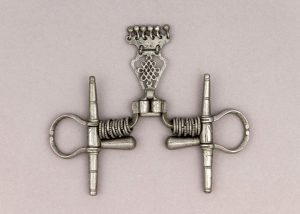
The search for the right bit is an ancient one. Archeologists now speculate that humans probably became equestrians at least 6,000 years ago, and riders have spent the intervening millennia trying to figure out how best to communicate with their horses. Early bits were made of vastly diverse materials, such as animal horn, bone, wood, sinew, rawhide, and rope. The appearance of metal bits coincides with the Bronze and Iron Ages, roughly the time between the 8th and 14th centuries BC. Discoveries of early metal bits in ancient Mesopotamia show remarkable similarities to the equipment sitting in your own tack room today. Through the ages, bits became more specialized to match the purposes the horse was being used for, and we can see examples of high ports, low ports, varying shank lengths, spades, and copper rollers that span the centuries.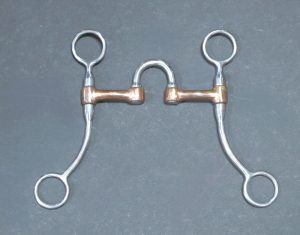
Today’s horseman has a plethora of choices. Understanding what bit is the most appropriate for your horse, your discipline, and your hands can be a challenge with so many options on the market and so many well-meaning friends offering advice. Three well-renowned horse trainers share their experience and thoughts on choosing the right bit for your horse.
Bret Parrish
Bret Parrish keeps his bit selection process simple. His philosophy is that the bit is important, but it’s only one piece of his overall training approach.
“We’re a little more old school in the fact that we pretty much train our horses starting with a snaffle and progress to a twisted snaffle.” Parrish says he will stay in a twisted snaffle until the horse is about 90% finished. He believes this is crucial for laying the fundamentals. “We’re teaching them balance and to be soft in the hands. If you can teach them to be soft in a snaffle, they seem to be more secure as you progress with their training.” Parrish cites other important factors in those early stages. “We teach a horse to frame up using the snaffle. We also use a lot of leg. It all starts from that early training. Then, we find we’re never using the bit as a crutch.” Parrish feels if he can go through those early stages with a twisted snaffle, he can keep a softer mouth on his horses and can delay progressing to a heavier bit.
 “Once we get toward the last few stages of finishing a horse, we will progress into a correction bit. We use a really short-shanked correction, mostly.” Correction bits are leverage bits with ports that have a joint on either side. The shanks are also jointed. They’re not used to “correct” anything; rather they’re typically used to train a horse to respond to more subtle cues. These bits can be very severe in the hands of an inexperienced rider and therefore must be used with skill and softness.
This finishing period is also the training stage where a little bit of finesse comes into play. Parrish looks for the right bit for each individual horse’s needs. He says, “Depending on the horse, we might have to go to something with a little more bite to it; but, generally, we carry that horse through as long as we can in the softest bit possible.” He will even show a horse throughout their first year with that mild, short-shanked correction bit.
“After they have a few more years of showing on them, we will go with a little higher port and a little longer shank.” He says that some horses prefer a rounder piece in the mouth, while some like it a little bit sharper.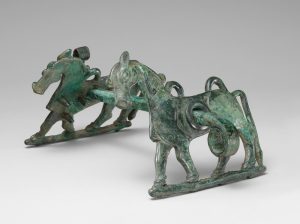 Some need a little different angle in the shanks. “As you progress into those other bits, you’ll find one horse wants to mouth the bit, or they will end up over done in the face. We will play with it to see what bit makes them soften in the face without getting over-bridled.” He doesn’t have much opinion regarding the use of copper or sweet iron mouthpieces. “We played with that, but we haven’t found that we’ve gotten anything different out of it. If we’ve done all our homework right, and brought that horse along to be soft and balanced, things like copper aren’t going to make a difference.”
Randy Wilson
“I never picked up a bit that made all my horses perfect,” Randy Wilson says. He believes that choosing bits is all about reading your horse as much as anything else. “I’m pretty simple when it comes to bits,” he says. “I start out with a smooth D-ring or O-ring snaffle, and I stay in that until they understand the bending and the moving of shoulders. If they’re real heavy, I’ll go to a fat twist, or twisted wire snaffle. If they’re light, I just use that D-ring snaffle.”
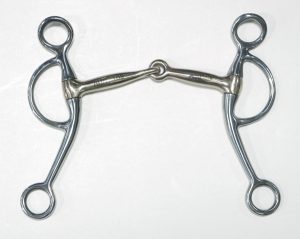
He moves to the next stage with a Tom Thumb. These bits look like a jointed snaffle; however, it has shanks rather than rings and uses leverage, which makes it a curb bit. They also incorporate a curb chain. As a result, these can be very powerful bits that exert a nutcracker-like action and therefore must be used with experienced hands. Wilson adds, “When you first put that on them, they don’t like it. The curb chain is new. You have to be patient with that process, because they might start showing a little resistance now that there is pressure on the chin.”
 From there, Wilson moves on to a correction bit and then to some sort of grazing bit. The shanks of a grazing bit were originally angled back so the horse could graze with the bit in its mouth. While that’s no longer the intention of this bit, it remains very popular for finished horses.
The variety of shank angles and curves in grazers can help fine tune bit selection. “I have a grazing bit that every horse I ride goes into since I’ve started,” he says. “Dale Wilkinson gave it to me. I just love that bit, and I go to it every time.” It’s so versatile that he had the mouthpiece replicated for a show bridle.
Wilson trains a lot of young horses. He has found that some of the two-year-olds get really mouthy when introduced to the snaffle. “A lot of people are quick to go to a cavesson when they do that. Instead, I take a little bit of vet wrap and put it around the mouthpiece.” He wraps both sides, but allows it to still swivel in the middle. “I take the reins off, and I’ll longe them a while with it hanging in their mouth. Then, I’ll tie them up about 30-40 minutes and let them have that in their mouth while they stand quietly.” After that, Wilson will ride them with that same wrapped snaffle a couple times and the problems often disappear. He insists, “I’ve had great success with that trick.”
Wilson has encountered many misconceptions about bits. He says a lot of people go to a bigger bit because of resistance issues. “When you go bigger, it actually causes a lot of problems, because the bits are more aggressive and create more resistance. If I go to a bigger bit, it’s so I can be softer,” he emphasizes. “I make sure all my fundamentals are there. Then, when I need a little more self-carriage, I can get that by being softer going to a bigger bridle. But, I try to get all the frame and get the resistance out before I ever do that.”
Wilson cautions that the show environment can create situations that are often misdiagnosed as a bit problem. “It’s more often a hand problem than a bit problem,” he says. “You’ve got your youth or amateur on there and nerves start getting involved. Their hands start working faster and they start going to the mouth quicker. They get resistance because of the timing of their hands.” The problem is multiplied if the horse has a bigger bit. Instead, he favors “using something that’s more forgiving where they can make a mistake with their hands and the horse doesn’t tell on them.” He adds, “It’s so competitive anymore, you have to leave your hand down. You can pick up your hand with softness and get away with it, as long as you’re not going all the way to their mouth or taking that slack out. To the eye, it doesn’t look like you ever moved your hand.”
He explains a common-sense method for telling if a horse has too much bridle for its level of sensitivity. “If he’s fine on a loose rein; but, when you pick up your hand, his head goes straight in the air, then that bit is too much. The horse hates it. Back off a little.” One solution is to change to more of a curved shank. “When you have a curve on a grazer, the bend in it helps you to get their face quietly when you pick up your hand.”
Wilson is a proponent of using different bits at the show for different classes. He explains, “In Horsemanship, you want to have contact with your horse. It’s easier to do that when you have a solid mouthpiece and that shank swivel. In Western Pleasure, you’re barely picking up your hand in the class. In Trail and Western Riding, your winners are on a full graze. There’s not a lot of contact. They’re backing them on a loose rein. You need something that the horse is very comfortable and confident in on a loose rein.”
His final advice is to find a bit that you get along with in the training process and stay with it. Wilson says, “If you’re climbing the ladder strong, you’re progressing nicely. Stay with it.” He says that the point at which you come to a standstill is what should prompt a change. “It’s trial and error. You have to realize that you’re going to back up a little when you change bits. It’s an adjustment for them.”
Kenny Lakins
Kenny Lakins is a straightforward trainer who keeps it simple. He’s seen a lot of things that work and plenty that don’t. “I’ve had a lot of guys come into my tack stall, look at my stuff, and say, ‘Well, you ain’t got much here!’” Lakins laughs. Unlike many trainers, Lakins goes straight to a Tom Thumb when starting colts. He reasons, “For one, if they want to run off, I have some control to pull him around.” He says a lot of trainers who have come to ride with him soon adopt his method. “They see that they can keep the colt in a circle and under control, rather than running around the arena in a snaffle.” He’ll keep with that bit for at least 60 days. He also advocates a lot of changes in bridles throughout the training and finishing process. “I might ride them in a small A for a week or two and then go to a grazer for a couple weeks,” he continues. “I might go to a small correction with swivels on the side for a couple weeks. For one, they don’t get bored. Also, by the time they’re broke, you’ve got a good idea of what they like and what they work best in.”
 He also insists that a bit doesn’t have to be fancy to get the job done. “I’ve got one bit in the tack room that can’t be more than $40. I’d say 90% of all the horses I’ve trained love that bit. It’s a small port curb bit with little cheeks on the side.”
Lakins counters common beliefs with old-fashioned horse sense. “A lot of people like to use big bridles, like a big A that’s two inches, or even three inches. They feel that it gives them a lot of control, and they don’t need to use their hands as much. Or they feel like a horse is hard mouthed and they think they need a bigger bridle. But, usually, what you really need a smaller, lighter bridle.” He explains that when you go to a bit with a tall port or a cathedral, it’s hitting the roof of the mouth at the same time the curb chain is hitting the chin. “So, you’re pulling on two parts of the horse’s mouth at the same time, and the horse pushes back against that.”
He says many people also believe that a bigger bit will make the horse tuck in their chin and give their face better. He believes the exact opposite is true. The only time he will use a high port is when a horse has a tendency to tuck their nose in too far behind the vertical. Then, the double action of the larger bit encourages them to poke their nose out a little to avoid the pressure.
Experience levels of riders are a big factor for Lakins when he’s selecting the right bit for a horse. “If I have a very experienced rider, regardless of their age, I’m fine with them using any kind of bridle because they know what to do. But, when you’ve got a novice, sometimes you need to use a softer bridle until their hands get smooth. Then, other times, you have a kid who you tell to pull on it and they barely touch it. In that case, you might put more bridle on the horse so that when they pull a little, they get a reaction.”
He says by the time the horse gets to be four or five, he can throw any kind of bridle on them to show because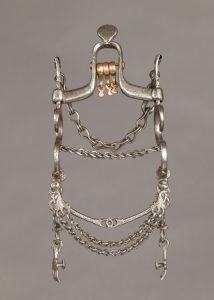 it becomes less about the bit and more about the entire package. “It’s so tough to show in Western Pleasure anymore,” he says. “You go in there and put your hand down and present your horse the best way you can. We use a lot of leg. You can’t pick your hand up because you’re going to get knocked back to third or fourth. If the judge sees you picking on them over in the corner, it gives them a good reason to knock you off their card.”
Lakins doesn’t use roller bits to pacify a nervous or bored horse. He’s tried rollers with horses that are prone to playing with their bit and laments that it only seems to make it worse. “I know a lot of Trail people use them and the All-Around people like them, but I feel a lot of our Western Pleasure horses aren’t as busy doing things like looking for the next obstacle, so they’re more likely to play with those kind of bits and get distracted. I’ve never had luck with them,” he concludes.
General AQHA Guidelines for Western Show Bits
(Please consult your breed or organization’s rulebook for specific rules.)
Horses five years-old and younger may be shown in a snaffle bit, hackamore, curb bit, half-breed or spade bit. Horses six years-old and older may only be shown in a curb bit, half-breed, or spade bit.
Snaffle bits in Western performance classes mean the conventional O-ring, egg-butt or D-ring with a ring no larger than 4” in diameter. The mouthpiece may be two or three pieces.
When a curb bit is used, a curb strap or curb chain is required, but it must be at least one-half inch in width and lie flat against the jaw of the horse. The port on a curb bit has a maximum height of 3½ inches. Shanks can be no longer than 8½ inches.
Prohibited
Wire curb straps, regardless of how padded or covered, or curb strap with tacks/rivets.
Mouthpieces that have donuts or prongs extending below the port.